johnj
Full Member
  
Posts: 178
|
Post by johnj on Jul 26, 2012 17:36:19 GMT -5
This project has been finished, or at least as finished as a diorama ever is, for a couple of months now. I decided to go ahead and do a construction thread and this seemed to be the logical place to put it. If you moderators think it should be somewhere else feel free to make the move.
First off, I want to stress I am not the expert on building dioramas. I am sure that there are other better techniques that can be used. The techniques I will show here are here because they have worked for me. If any of you have another way to do something I sincerely hope you will post it. One of the beauties of a forum such as this is that we can ALL learn from each other.
Having said all this, I will get started on the thread with photos tomorrow. Again, I am always open to expressions of awe, hero worship, suggestions, criticism, and friendly redicule. ;D ;D Hope you guys enjoy this.
|
|
|
|
Post by Bill (admin) on Jul 26, 2012 17:44:32 GMT -5
This looks like a great spot John! I've actually been
lookin' forward to this for a long time.
Yahooooo!
|
|
johnj
Full Member
  
Posts: 178
|
Post by johnj on Jul 27, 2012 9:49:11 GMT -5
Okay, here we go. The first photo shows what we are looking to have at the finish. 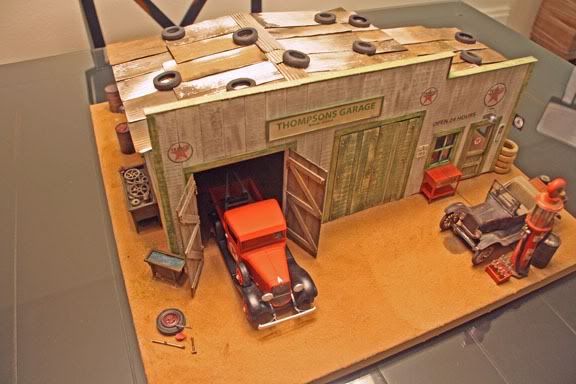 This station has never existed. The name, though, comes from a branch of my family that has operated a number of stations in various Arizona towns since the 1930s. When I begin a diorama I usually do a rough sketch of the intended model. I won't subject you to my sketches as believe me I am no artist. Following the sketch I lay out the various elevations of the building in simple line drawings to get an idea of what I will be working with and to keep track of the deminsions.  Believe me, laying out the line drawings is worth the time involved. I am constantly referring to them as the building goes together. After the line drawings are done I then cut 1/4 inch foam board to size and cut the window and door openings.  After the various walls are cut I temporarily put them together to spot any mistakes. If you look closely here you will notice that the office portion of the building is not square. I cut the back wall too long.  At this point things can easily be corrected. That's it for today. Tomorrow we will get into bracing and finishing the walls. Hope you are enjoying this. Comments always welcome. John |
|
|
|
Post by Bill (admin) on Jul 27, 2012 11:10:32 GMT -5
Enjoying this? Oh Brother John you KNOW I'm enjoying this!!!
Your dio is out of this world kind of sweet... And now we get
to learn how to do it. How Sweet Is That? I can't thank you
enough for doing this thread man!
I'm lovin' it!!!
Bill
|
|
hotrodmodeler
Junior Member
  If it isn't FUN, It isn't WORTH DOING!!
Posts: 62
|
Post by hotrodmodeler on Jul 27, 2012 20:31:28 GMT -5
This is GREAT! You just may get me into building dioramas with this good info....
Thanks for posting this tute.
8-)RICK
|
|
johnj
Full Member
  
Posts: 178
|
Post by johnj on Jul 28, 2012 9:31:12 GMT -5
Here we go for today. After cutting he foam board into the appropriate shape and checking it for size, I take the mock up apart again. I prefer to do as much work on the walls as possible while the walls are laying flat. I purchase my bass wood from a local exotic wood dealer in mill ends.  The mill ends are usually 1" to 1-1/2" thick and up to 18" long. Buying the wood in this manner really cuts down on the price. This piece cost me about $4.00. I then rip the wood to the required demensions on my band saw.  There is nothing fancy about my band saw. The secret to well demensioned lumber is just to keep the band saw well tuned. If you do you will have no problem with cutting the appropriate demension lumber. In a matter of an hour or so you can have enough lumber for the entire project at a fraction of the cost of buying ready made lumber. In the case of this diorama much of the interior of the building will be visible so the walls will be finished.  I stain the wood using home mixed alcohol/india ink stains. I can't give you the proportions as I just take a pint of 97% alcohol and add ink to it until I have the color I want. In the case of this building I used three different stains. The inside sheeting of the wall goes on first creating the appearance of a wide board wall. I use Elmer's Carpenters Glue to attach the boards to the foam board. Because the wood is already stained you don't have to worry about the glue interferring with the stain. After the walls are covered with the boards I apply weight and set the wall aside to dry. After the wall boards are dried I then apply the studs on scale 24" centers and also apply fire blocks as well as outlining the windows and doors. In this case I use a thick CA glue because of its quick drying qualities.  I think this gives a pretty accuurate depiction of a rough framed interior wall. Next we turn the wall over to complete the outside.  The boards are stained with a gray A/I stain followed by a brown A/I stain. I then use cheap craft paint on the outside walls. The paint is thinned to about 75/25 paint to water. After the pain dries I use a scratch brush to remove enough paint to get the appearance I desire. At this point we have a foam core wall that is braced to the point that it WILL NOT warp. I have used this technique on my last three dioramas and have not had any degree of warping of the walls. Okay, that's it for today. Tomorrow we will make and install the windows. Thanks for looking. |
|
|
|
Post by Bill (admin) on Jul 28, 2012 12:30:54 GMT -5
Absolutely Incredible John!
these pics show just how much time,
and effort goes into a project like this.
Although the finished build is amazing,
few people really understand what is
really involved!
Thank You For Bringing This Here!
Bill
|
|
|
|
Post by Steve-o on Jul 29, 2012 9:19:34 GMT -5
It was an absolute pleasure seeing your how to's & step by steps on this .
We really appreciate you taking the time showing this for us
A Big Thanks John !!
And looking forward to seeing your future work !! ;D ;D
|
|
johnj
Full Member
  
Posts: 178
|
Post by johnj on Jul 29, 2012 10:13:11 GMT -5
Okay, now it's time for the windows. Because I didn't really intend to do an in depth tutorial on this diorama I am lacking in photos, but if guys want I will do a complete tutuorial on making simple windows in the future. Anyway the first thing to do is make yourself a simple squaring jig. I use plastic sheet and square tube.  I use acetate from notebook dividers for the glass. It's a lot cheaper than using styrene sheets. I cut the acetate to the size I want the window to be and then, using the squaring jig I glue the frame of the window to the acetate. The beauty of using the divider sheets, in addition to cost, is that you can use AC glue without the danger of clouding the sheets. When the windows are complete I fit them to the openings in the wall from the inside and align them with the outside surface.  After the windows are glued in place I turn the wall over and trim out the outside of the window like so.  As you can see, the door openings are also trimmed out in the same manner. That's really all there is to making simple windows. Making windows that can be opened and closed is somewhat more complicated, but nothing that can't be done with some practice and willingness to take the time. That's it for this time. Keep watching this space ;D. |
|
johnj
Full Member
  
Posts: 178
|
Post by johnj on Jul 29, 2012 10:49:21 GMT -5
I have a little extra time this morning so I thought we could talk a little about signs. You have to be careful that you don't overdo signs. If you get too many on a structure they really distract from the model. In this case old time desert gas stations usually had many signs. They wanted to identify where the building was and who was the owner. In addition they wanted it known it was a Texaco Station and that there was towing provided. Being the desert, they wanted it known that cold Coca Cola was available as well as the ever popular Lucky Strike cigarettes. In addition they were open 24 hours a day and finally the circus was coming to town. In the window is proudly posted the advertisement that the owner is a member of the National Recovery Administration (the 1930s version of the Federal bailout). 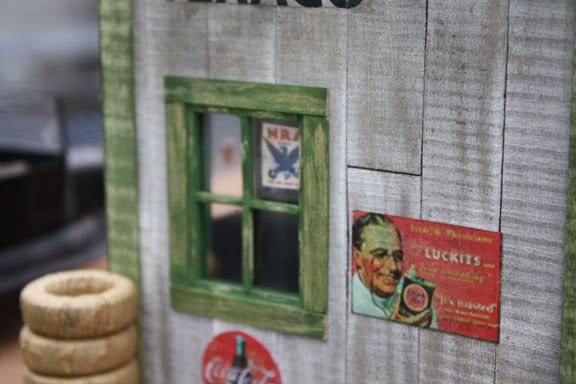  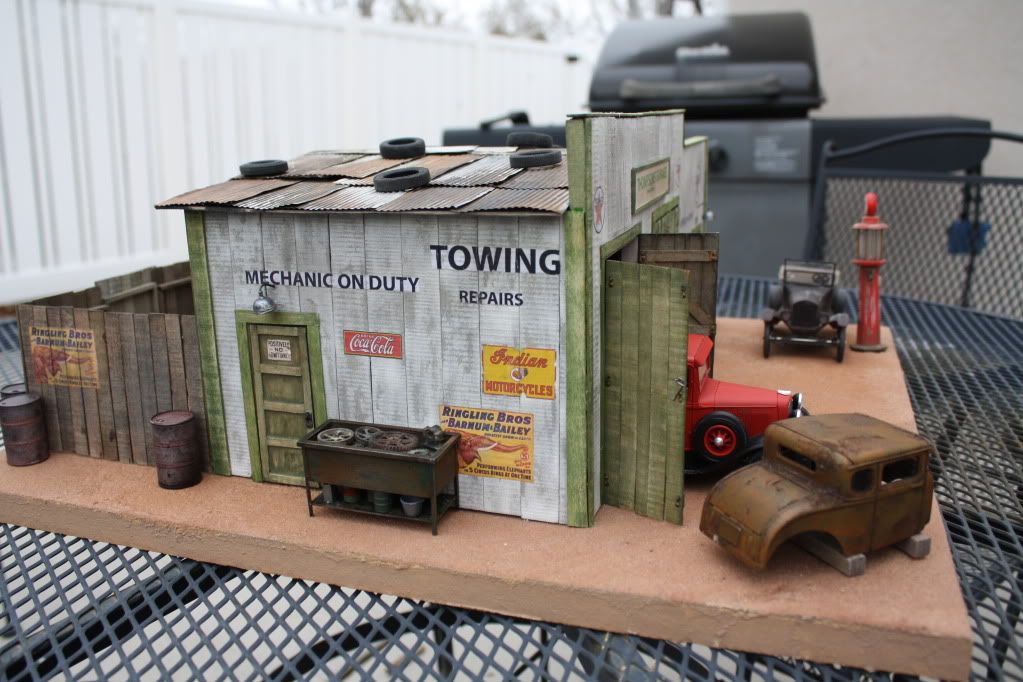  All of the signs on this building were found on the internet, sized in PhotoShop and printed on plain copy paper. After the signs were printed they were CAREFULLY thinned with sandpaper until only the printed surface of the paper was there. Then, using a white glue/water mix the signs were applied to the walls. Using a new #11 blade I sliced the signs in the area between boards to give them the appearance of being painted on. The Thompson's Garage sign was too large to use this technique. After three tries, each time ruining the sign, I glued the sign to another board and framed it. It was then mounted on the wall. That's it for today. Tomorrow we will get the roof on. |
|
|
|
Post by hotwheels on Jul 29, 2012 15:24:31 GMT -5
wow, sorry I meant WOW.
If I had the room here I'd have to build. Then I would have a use for all the veneer I have available.
Very sweet "how to".
Thanks,
Bob
|
|
johnj
Full Member
  
Posts: 178
|
Post by johnj on Jul 30, 2012 10:59:29 GMT -5
The roof of the building is not visible from inside the model so I just used flat sheet 1/16 plywood for the roof surface. I wanted a weathered corregated roof for this building. To create this is simple, but time consuming. I apologize for the quality of the photos, but I had my white balance set wrong and didn't notice it until I was done. To make the sheets of roofing you need the following:  1. A roll of ArtEmbos aluminum sheet. This is available at most craft stores. 2. A sheet of Evergreen corregated sheet styrene. For 1/24 scale I use a 3/16" spacing. 3. A wooden or metal stylus. First cut the sheet aluminum to scale size. On this model I used 4'x8' sheets. Align the aluminum sheet on the styrene and use the stylus to scribe the ridges in the sheet like so. 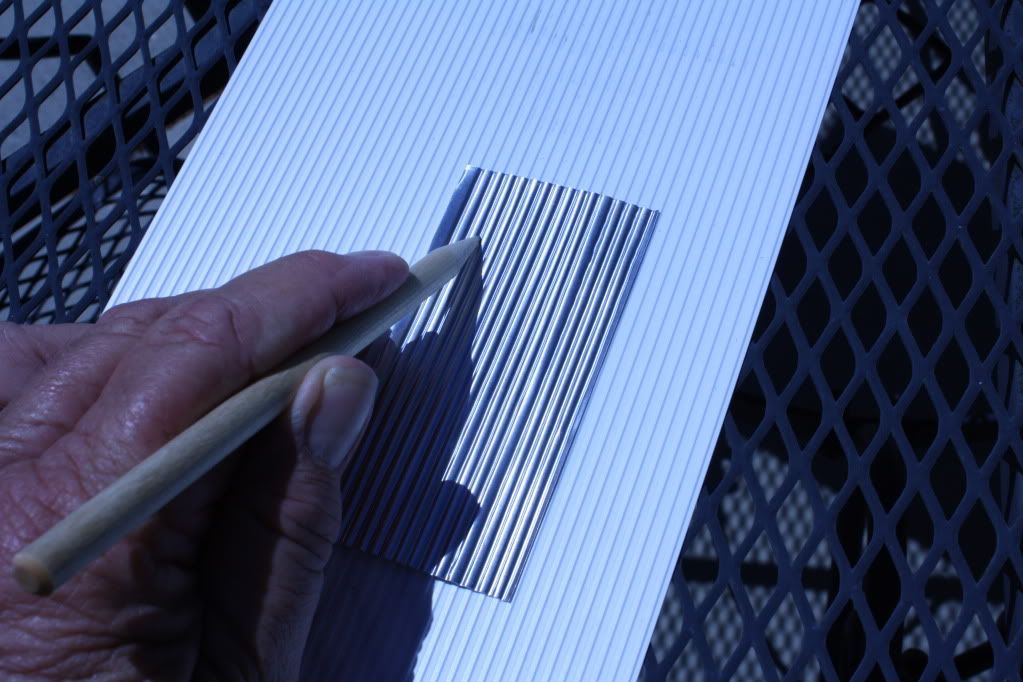 After a bit you will end up with a stack of corregated sheets looking like this.  Now comes the fun part ---aging the panels. I use PCB Etchant from Radio Shack.  THIS STUFF IS FERRIC CHLORIDE ACID AND I CAN'T STRESS ENOUGH JUST HOW DANGEROUS IT IS TO WORK WITH. I DO NOT RECOMMEND THAT YOU USE THIS TECHNIQUE UNLESS YOU ARE PREPARED TO TAKE ALL SAFETY PRECAUTIONS WITH IT. |
|
johnj
Full Member
  
Posts: 178
|
Post by johnj on Jul 30, 2012 11:34:02 GMT -5
Sorry about that, "She who must be obeyed" had a little job for me and I had to shut down. Continuing on: When aging the panels here is the set up I use.  1. I wear a heavy long sleeve shirt with the cuffs buttoned. 2. I work in a well-ventilated area of my garage and wear a respirator. 3. I wear eye protection. 4. I wear heavy rubber gloves. 5. I use long tweezers for moving the panels from bath to bath. To age the panel first dip it in the bowl containing the ferric chloride. Allow the panel to rest in the acid until you see bubbles forming. This will not be long so be prepared to move the piece to the first water bath. 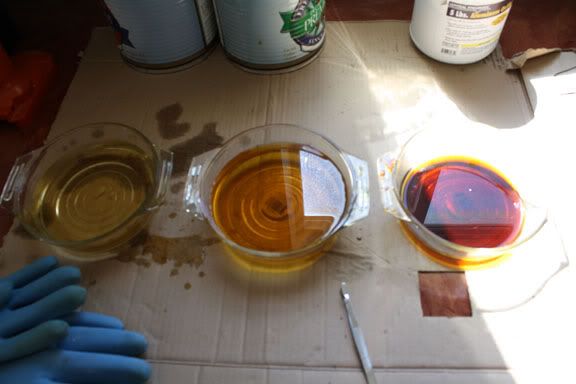 In this photo the bowl on the right contains the full strength acid. The other two bowls contain water to stop the chemical reaction. It is necessary to change the water every few pieces as it rapidly becomes contaminated. After bathing the panel in the acid move it to the first bowl of water and kind of slosh it around to stop the chemical reaction. After a period of time in this bowl move the panel to the next bowl and let it lay in that water for at least a minute or two. Remove the panel from the second bowl of water and place it on newspaper or such to dry. I usually leave the panels on the paper overnight as I have found that they continue to age for several hours. When all is said and done, depending on the amount of time you left the panel in the acid, you will end up with a panel looking like so. 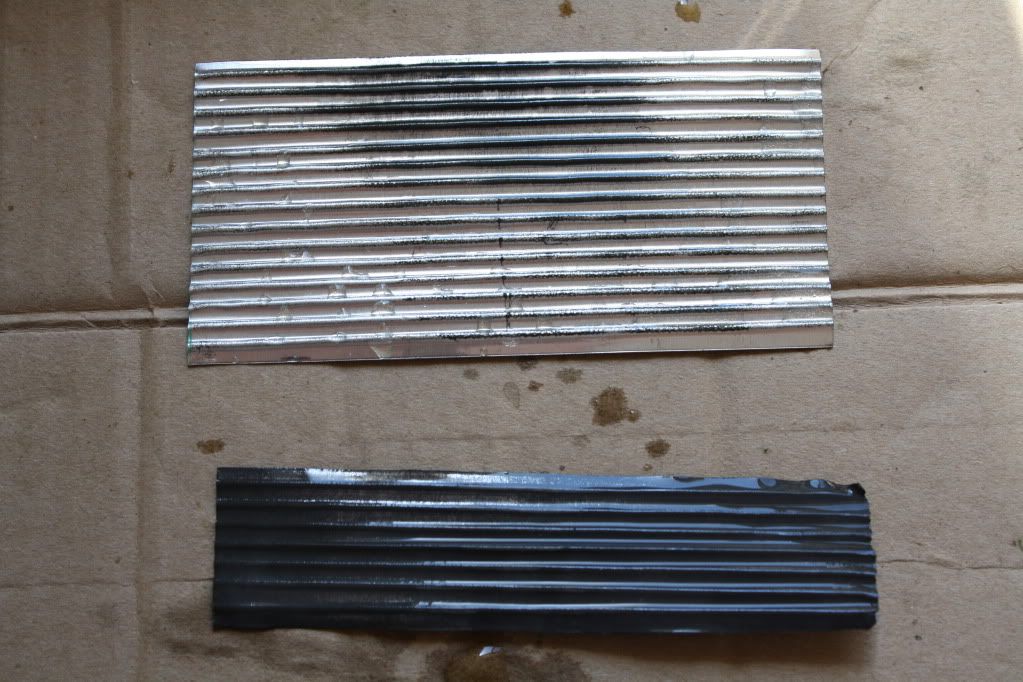 Both of these panels had just been removed from the water bath and did continue to age over the next several hours. I had deliberately left the lower panel in the acid for too long just to show how much it can age in just a few seconds. Here is a shot of how the final aged panel should look.  Remember, the age of the roof will be dependent on how long you leave the panel in the acid. ONE MORE TIME, IF YOU DECIDE TO USE THIS TECHNIQUE FOR AGING METAL PANELS BE CAREFUL!!! Tomorrow we will get into the details and final aging of the building. I hope this is useful to you guys. |
|
|
|
Post by Bill (admin) on Jul 30, 2012 17:03:37 GMT -5
This thread (Tutorial) just keeps getting better everyday!
Thank You John!
Bill
|
|
|
|
Post by rustyrat1960 on Jul 30, 2012 19:20:06 GMT -5
        WOW!! This is the "bees-knees" for sure!! I LOVE IT!! Thank You Bill for inviting John! John Thank You for joining!! WOW!! Thank You for sharing this beautiful tutorial! WATCHING for more!! Later Russ 
|
|


